ISO Partner Training
Complete guide to merchant onboarding: from creation to go-live
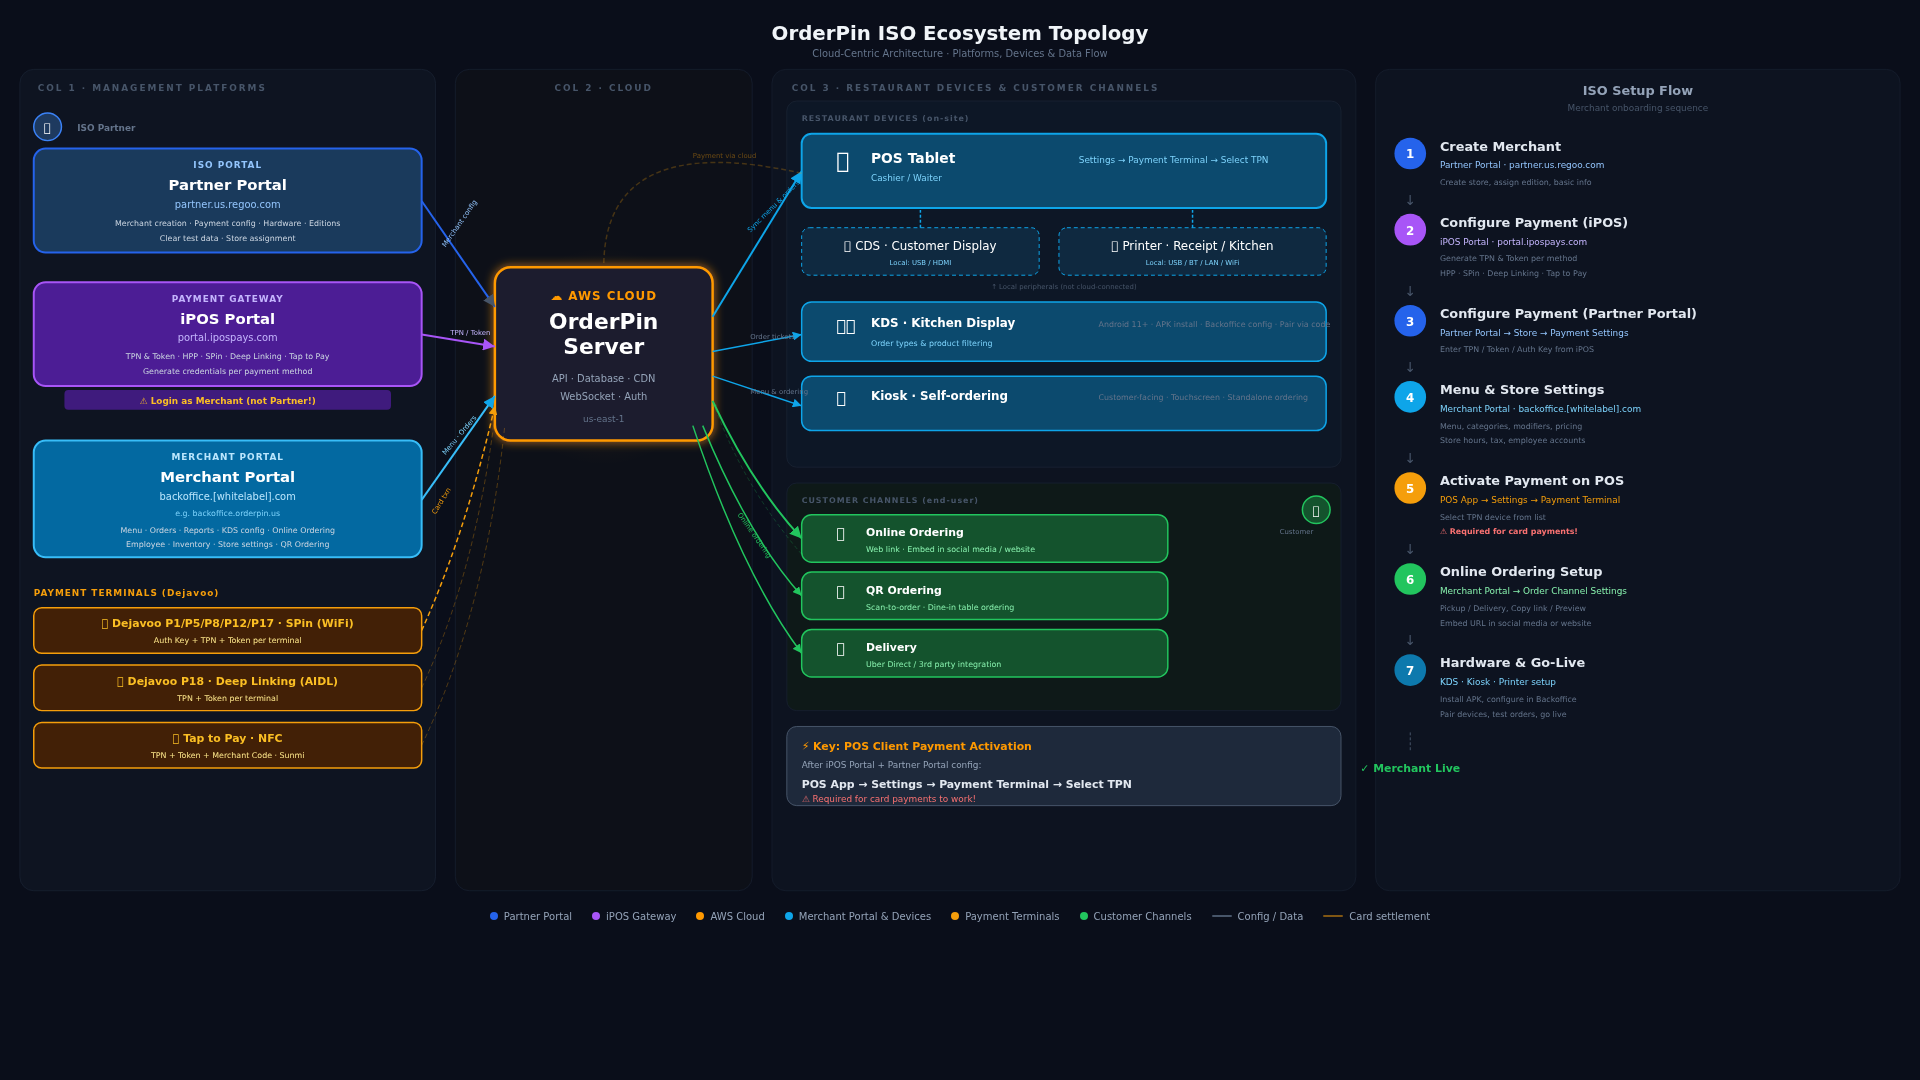
Click to view full interactive diagram
ISO Setup Flow
Payment Methods Comparison
| Feature | SPin (WiFi) | Deep Linking (P18) | Tap to Pay (NFC) | HPP (Online) |
|---|---|---|---|---|
| Device | Dejavoo P1/P5/P8/P12/P17 | Dejavoo P18 | Sunmi Cpad/D3 Pro | N/A (Web-based) |
| Connection | WiFi | AIDL (Local Device) | Built-in NFC | HTTPS (Internet) |
| iPOS TPN Type | SPin | Deep Linking | Android ToP | HPP (CloudPOS) |
| Required Fields | Auth Key + TPN + Token | TPN + Token | TPN + Token + Merchant Code | TPN + Token |
| iPOS Source | portal.ipospays.com | Same | Same | Same |
| Regoo Config Location | POS Payment → Dejavoo | POS Payment → Dejavoo | POS Payment → Dejavoo | Online Payment → Dejavoo |
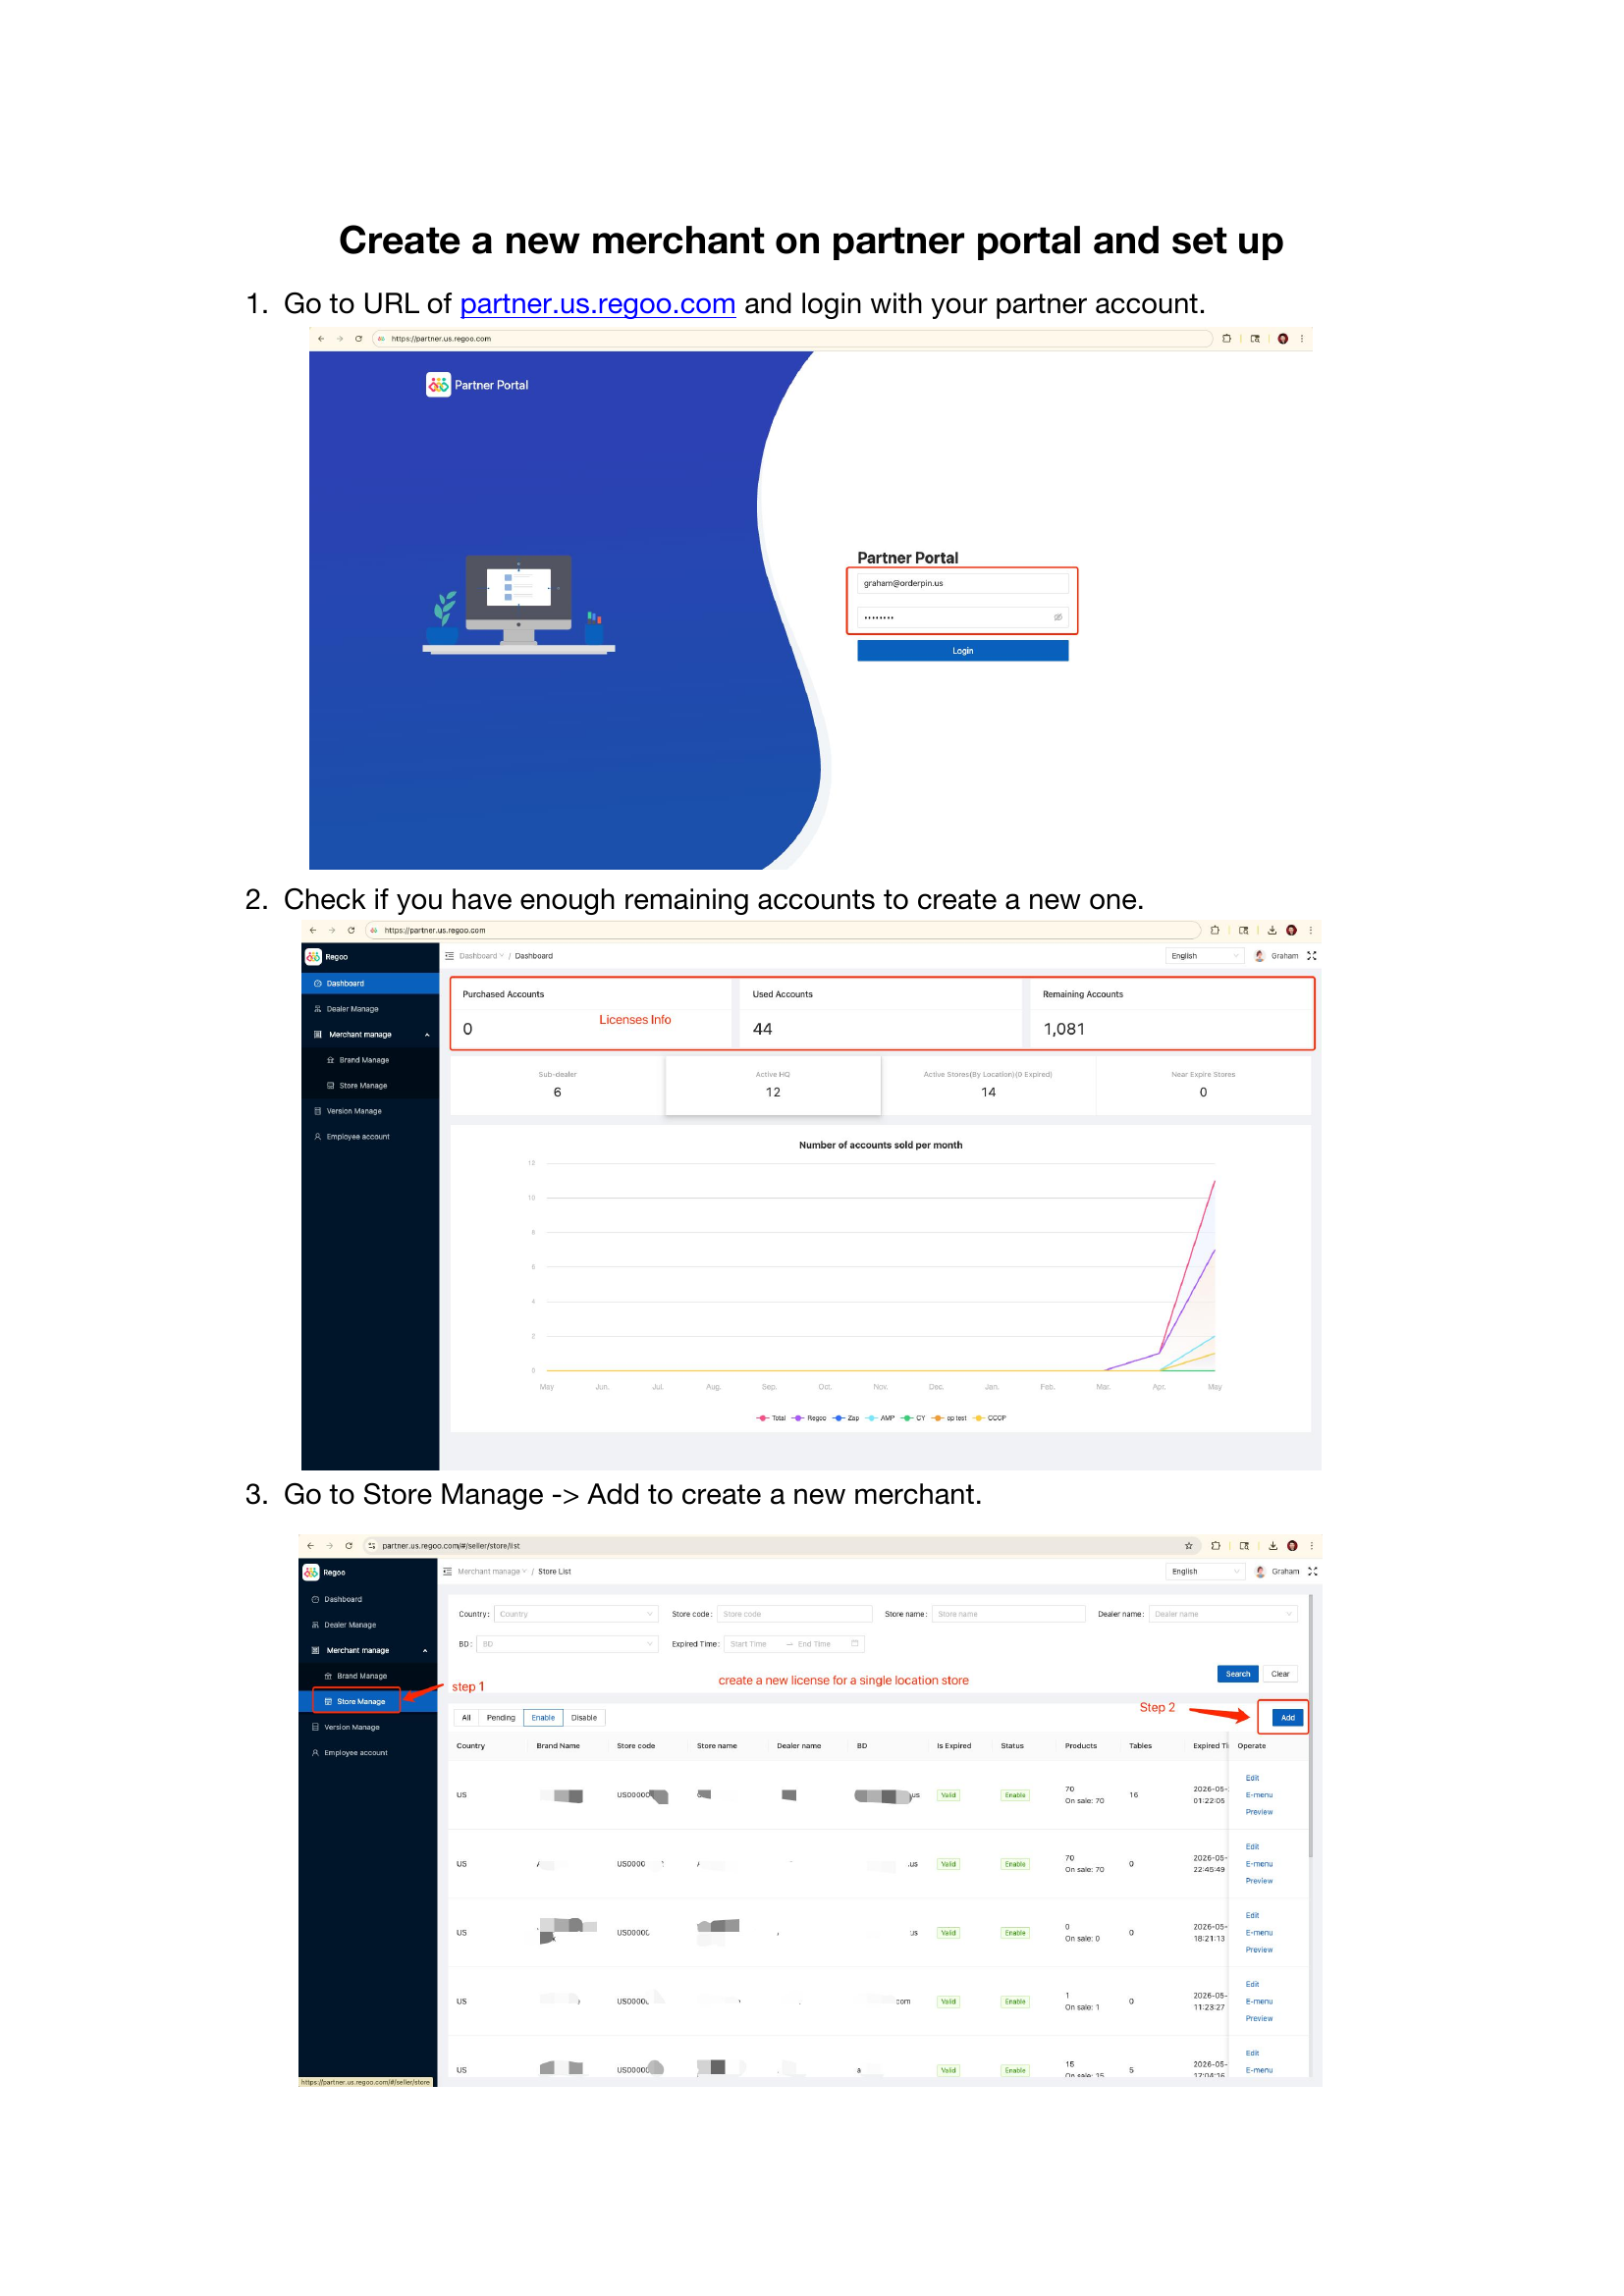
Step 1: Create Merchant
Platform: partner.us.regoo.com
- Login to Partner Portal with ISO credentials
- Navigate to Stores → Create New Store
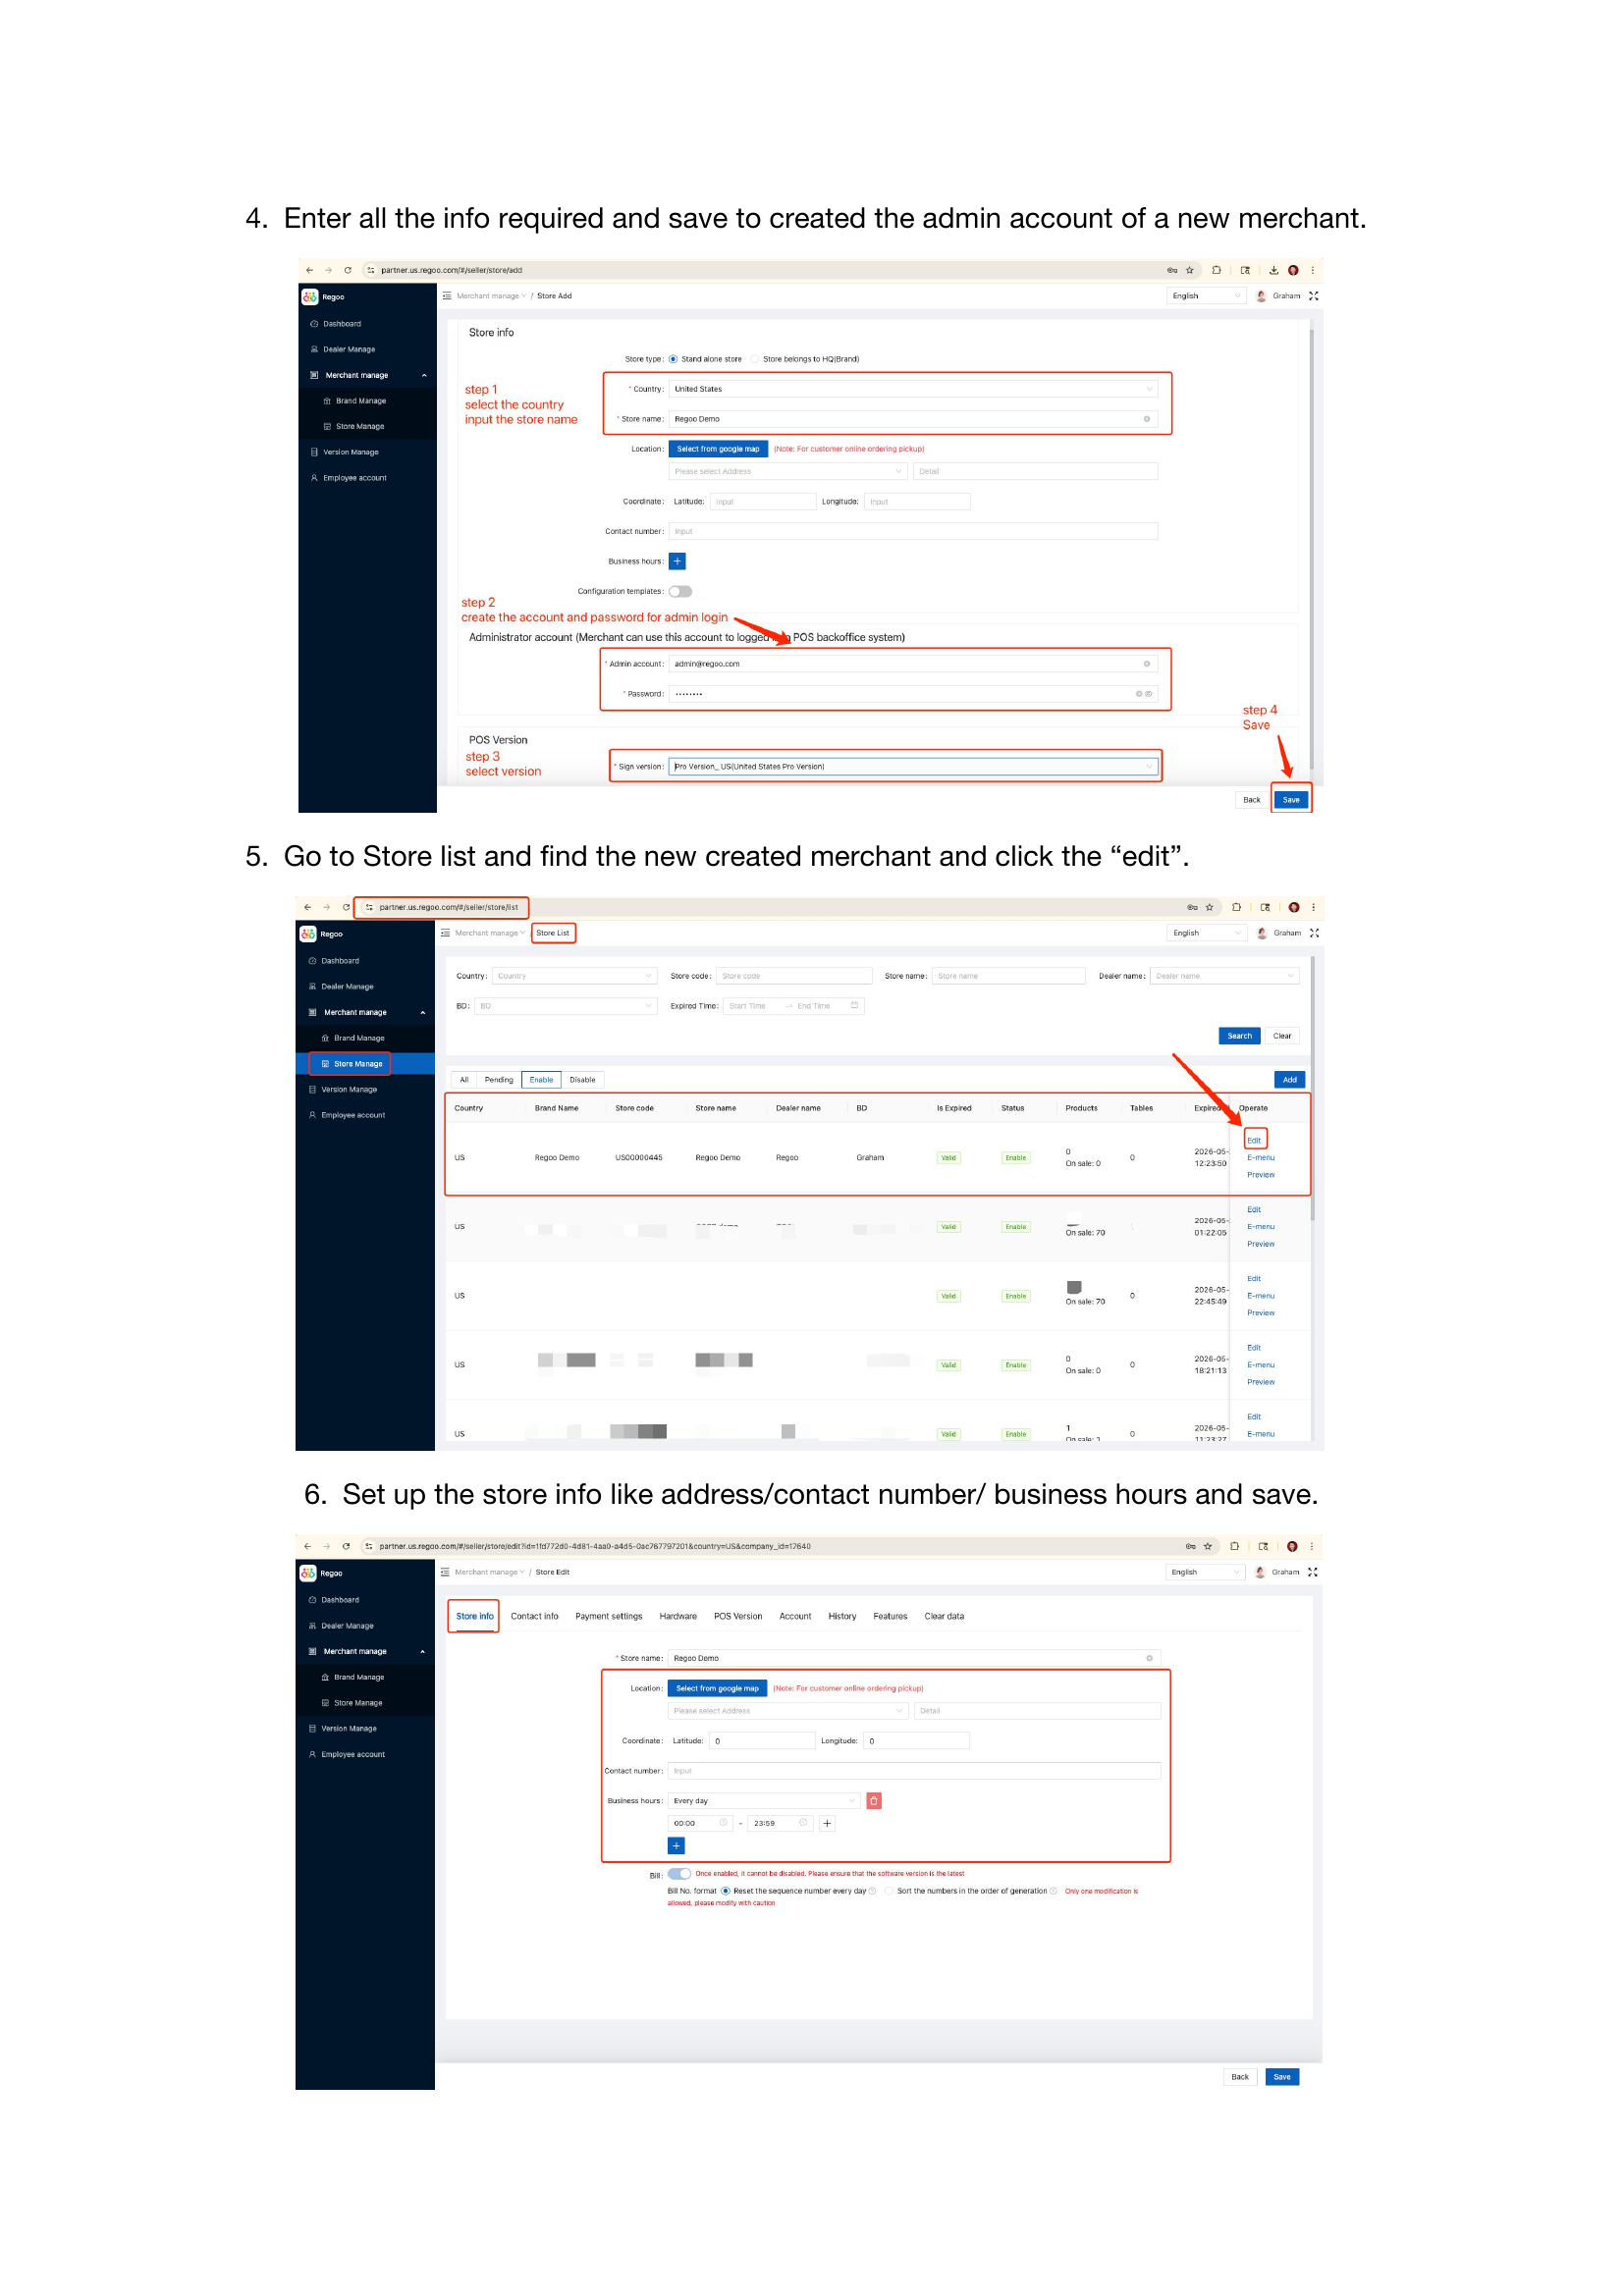
- Fill in merchant basic info (name, address, phone, email)
- Assign Edition (features package)
- Configure Store Settings (hours, tax rate, timezone)
- Save and note the Store ID for later steps
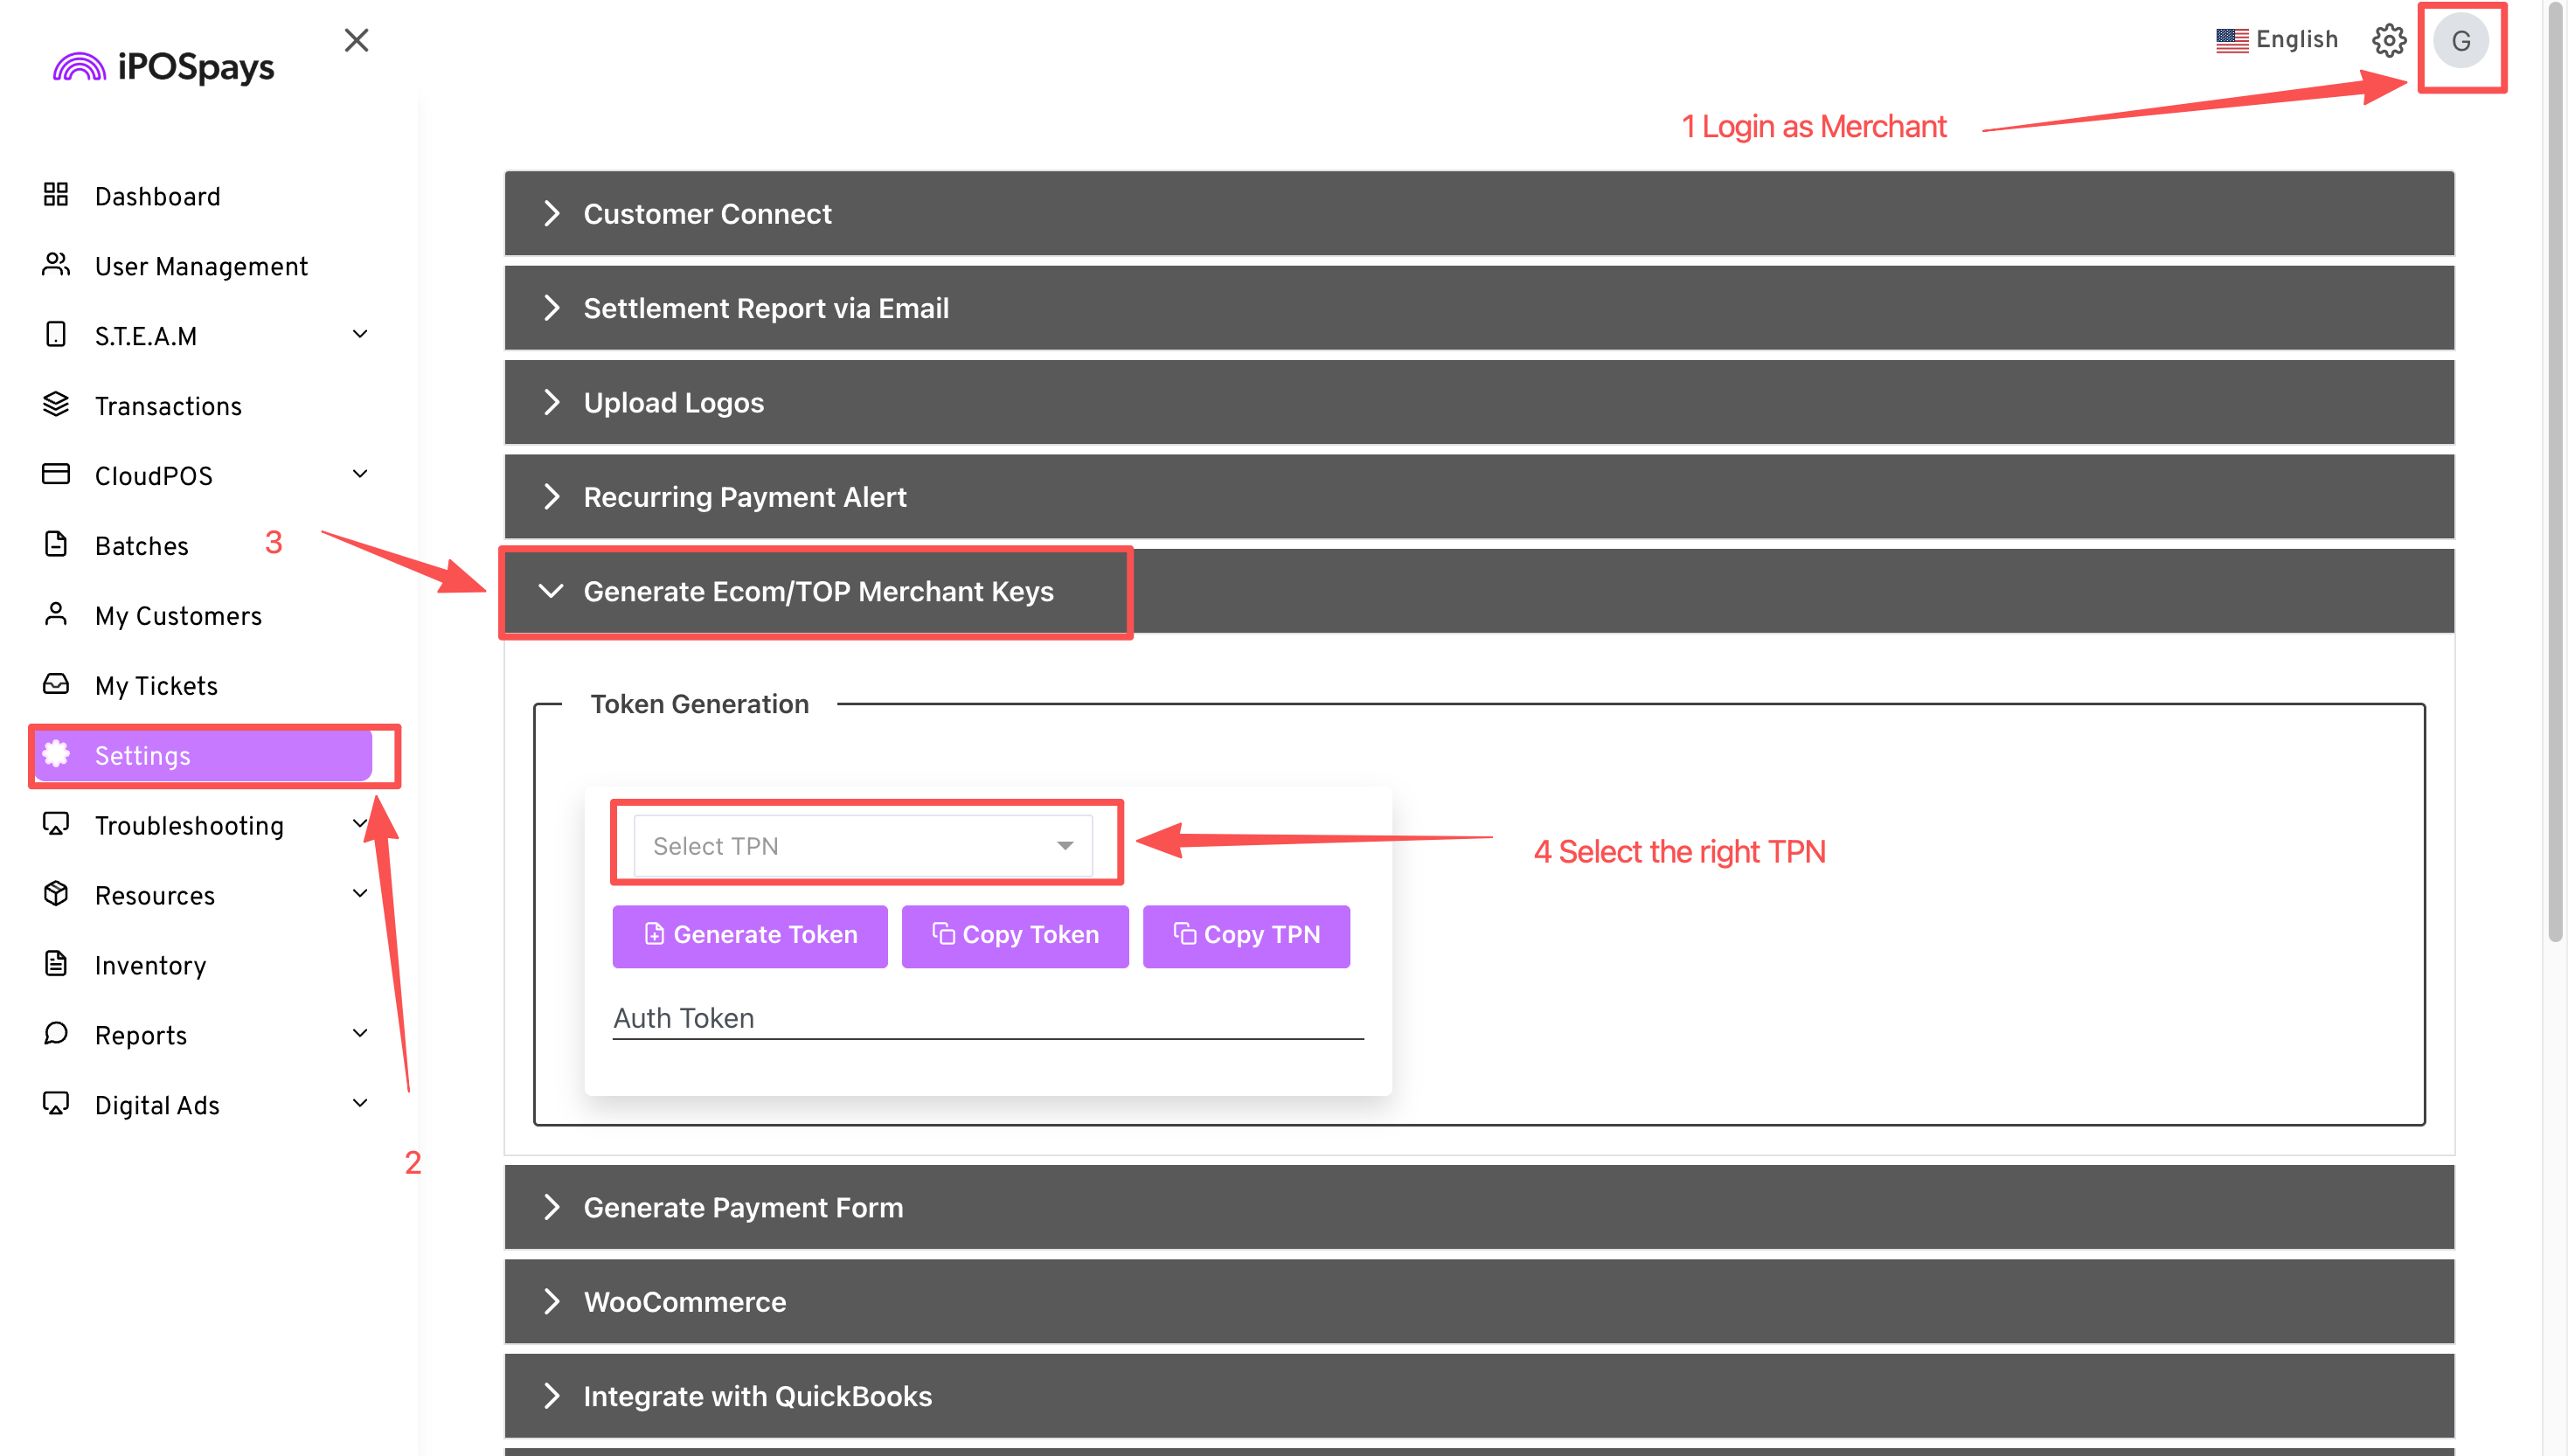
Step 2: Configure Payment - iPOS Portal
Platform: portal.ipospays.com
- Login to iPOS Portal as Merchant (use the merchant account created by the ISO on the iPOS Portal platform — this is NOT the same as the Partner Portal account from Step 1)
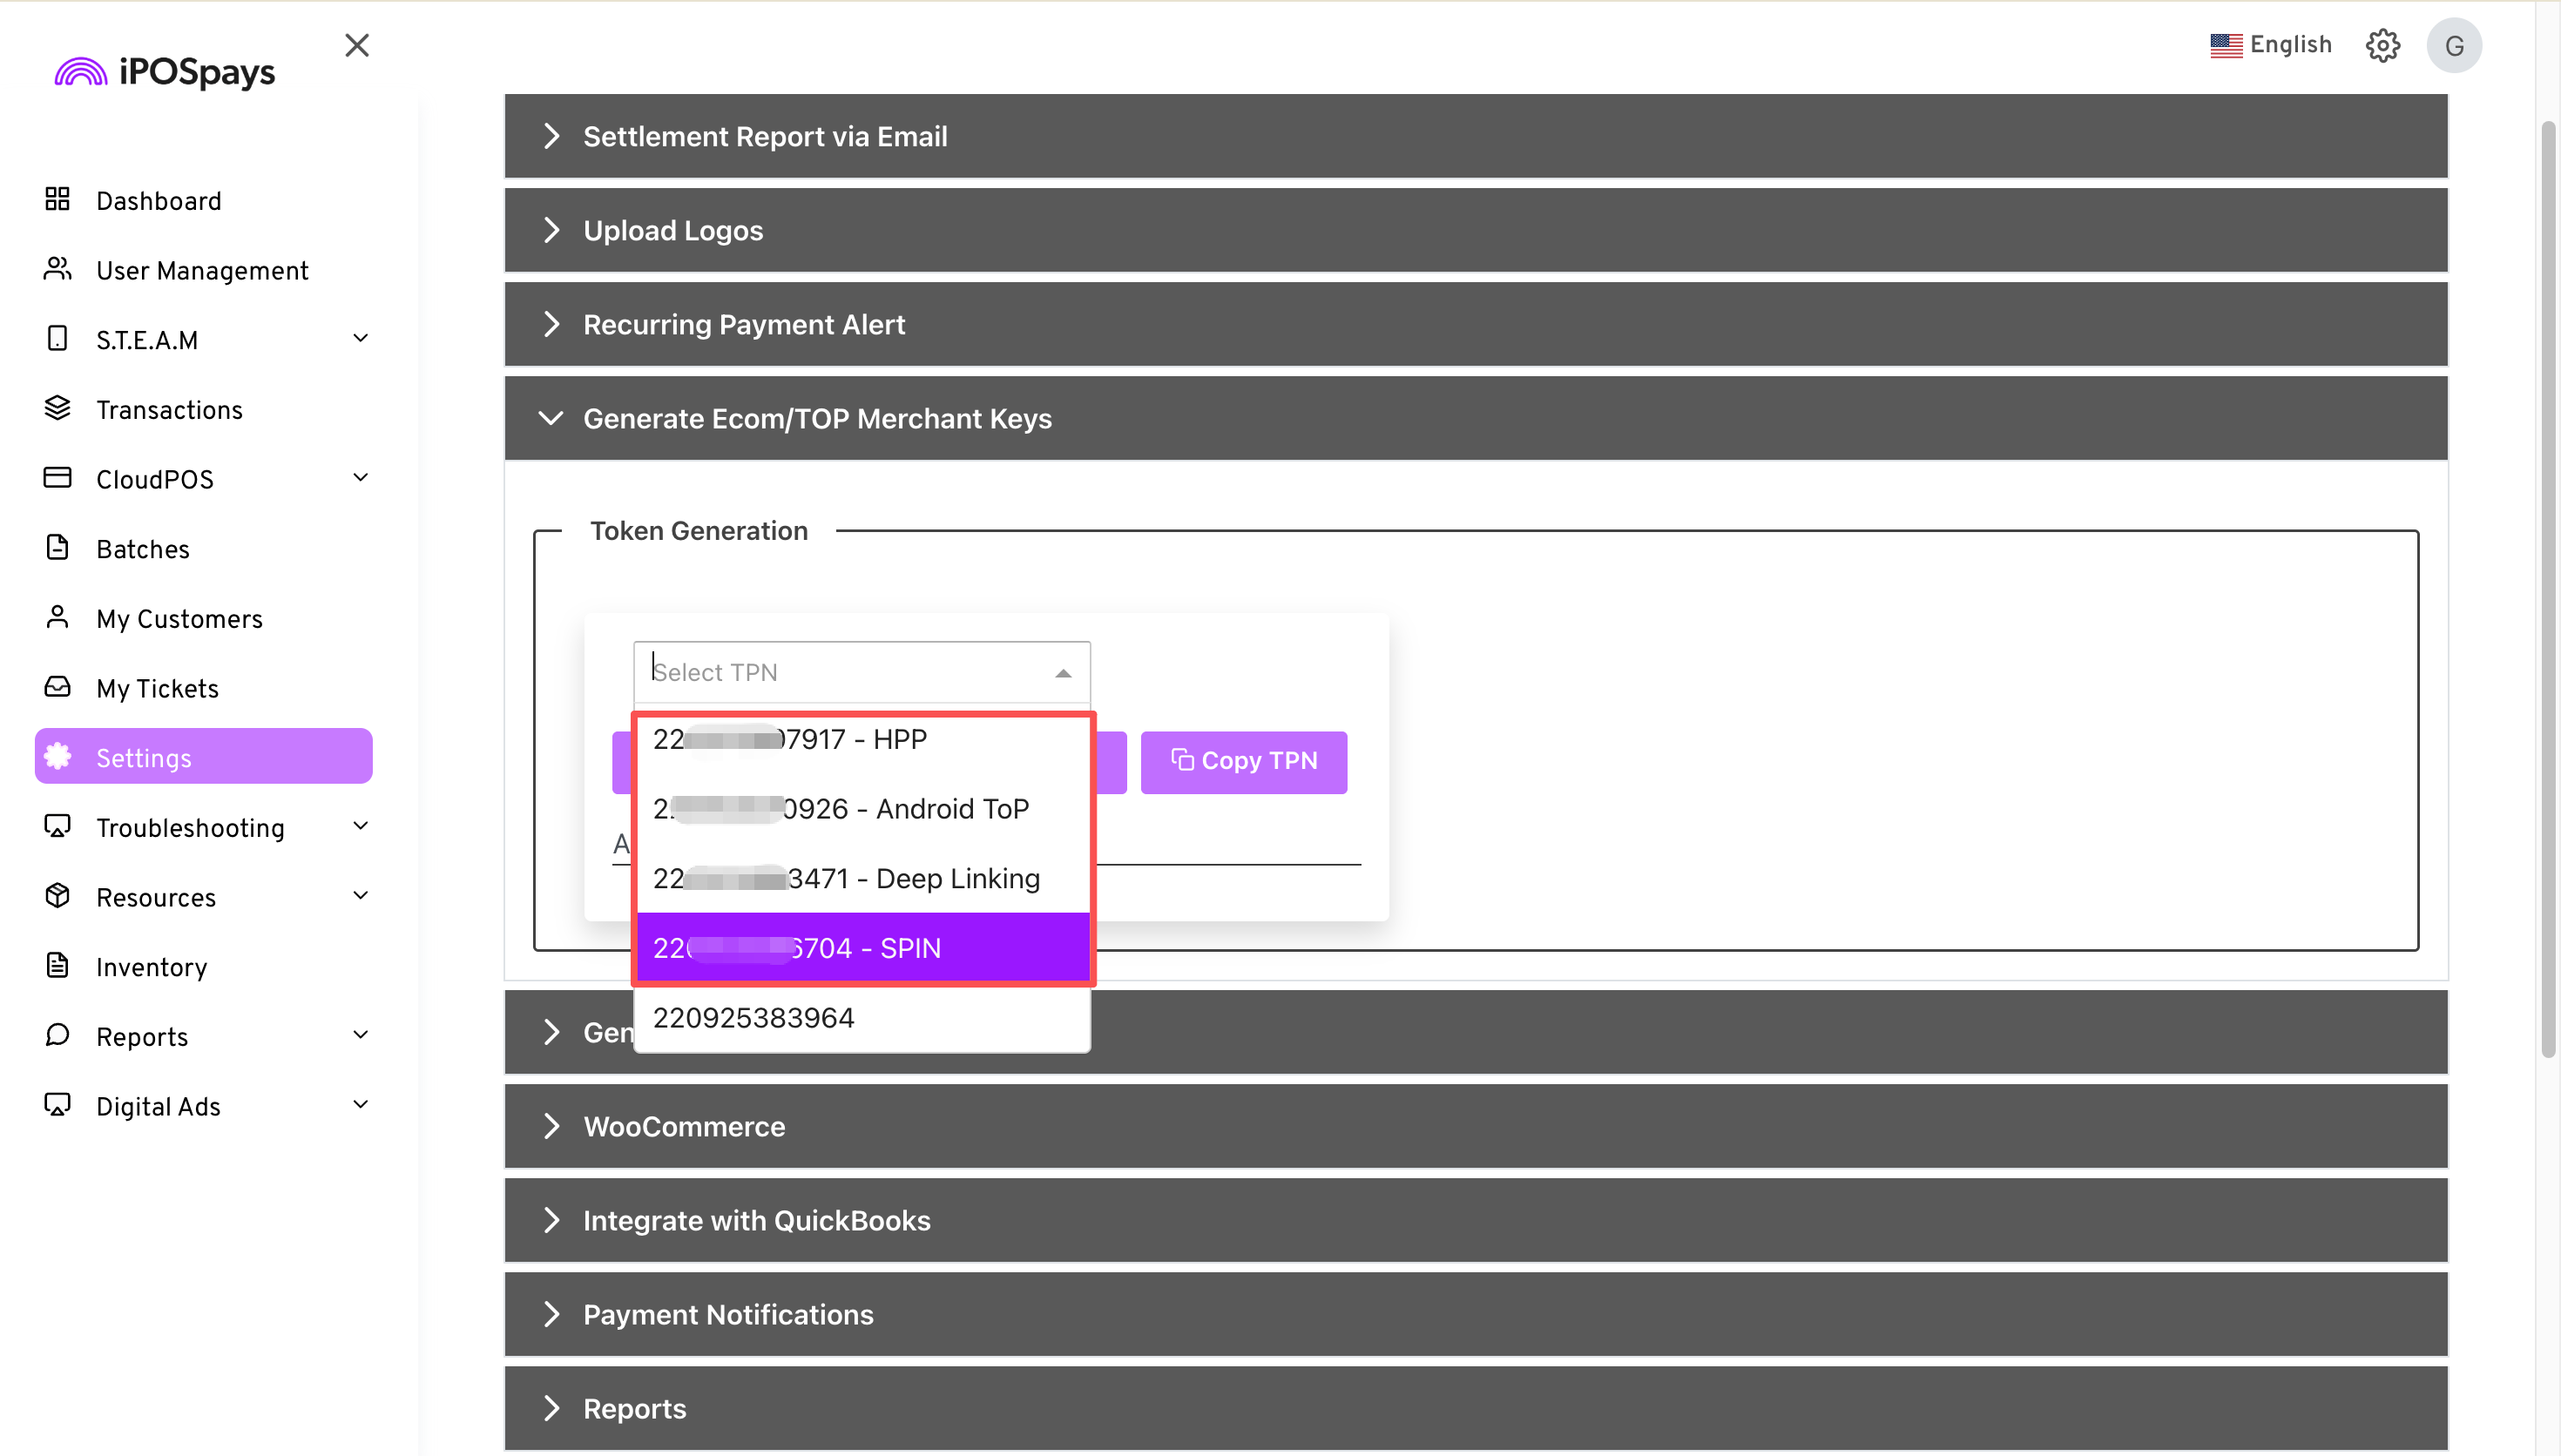
- Navigate to TPN Management section
- Click 'Create New TPN' or 'Add Payment Terminal'
- Select TPN type based on payment method needed:
- HPP (CloudPOS) → Online Payment (Hosted Payment Page for online ordering)
- SPin → POS SPin (Dejavoo P1/P5/P8/P12/P17 via WiFi)
- Deep Linking → POS Deep Linking (Dejavoo P18 via AIDL)
- Android ToP → POS Tap to Pay (Sunmi)
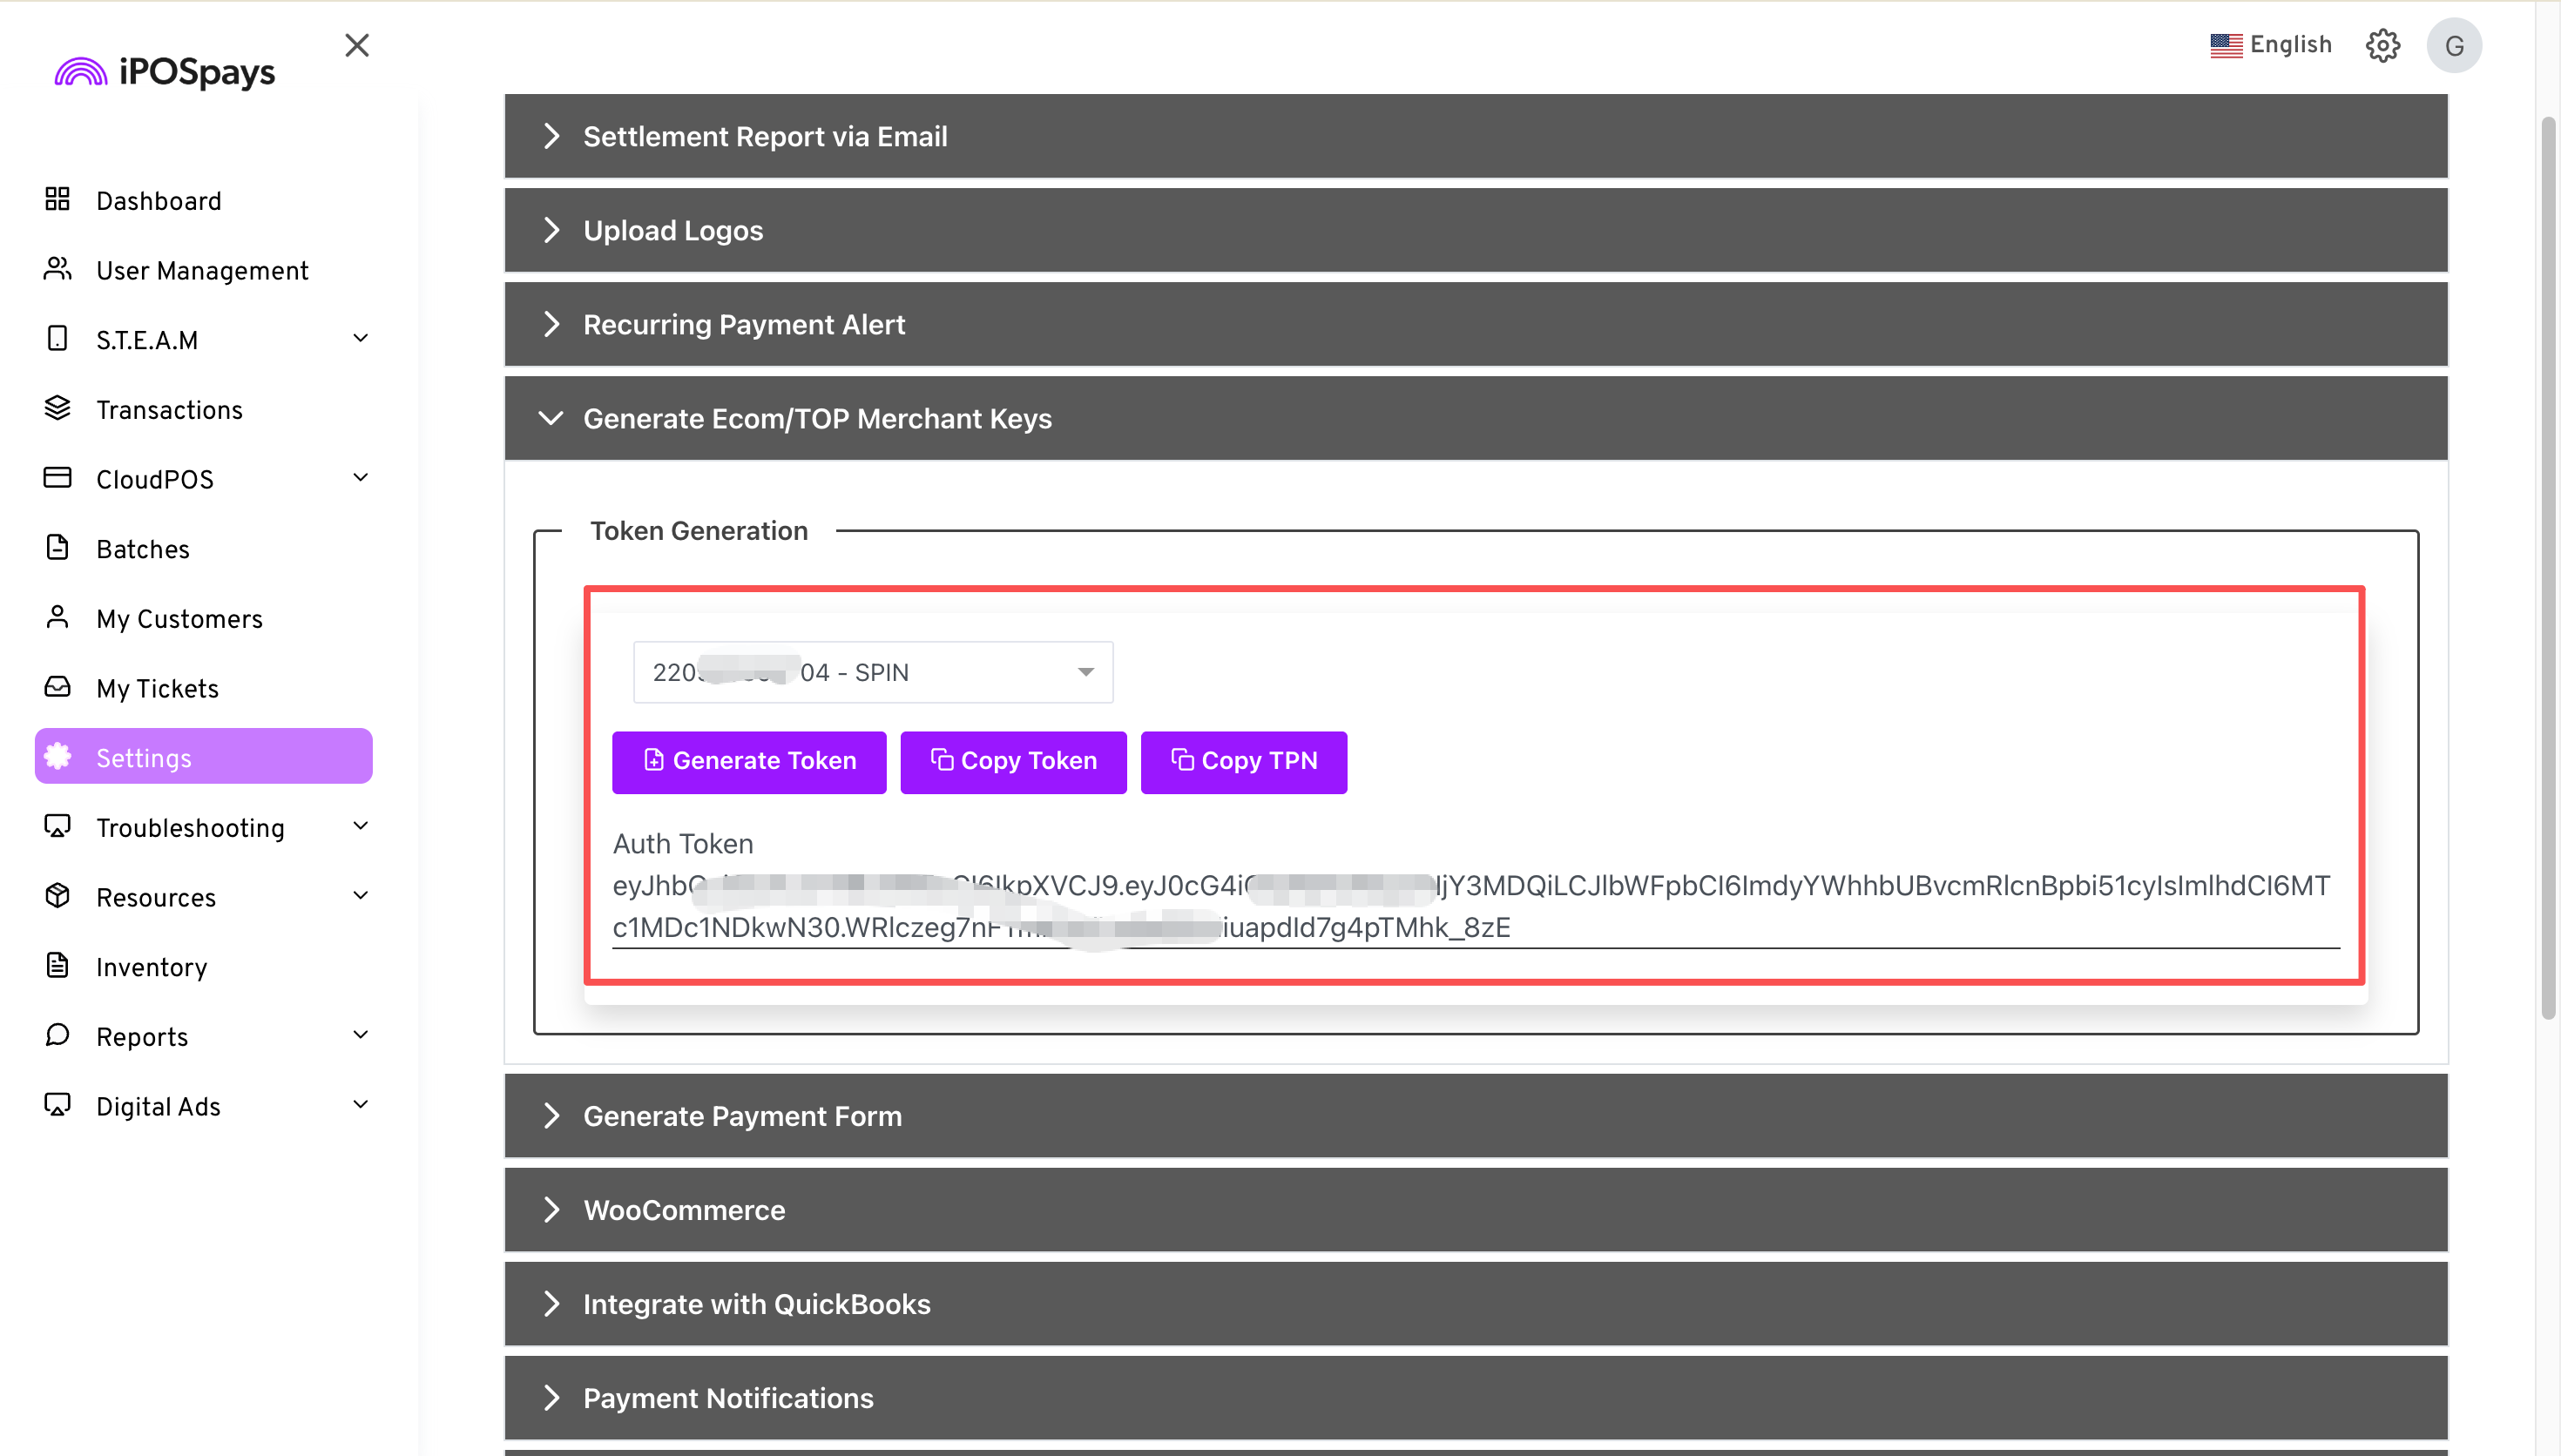
- Complete TPN configuration form and generate credentials
- Copy and save:
- TPN (Terminal Payment Number)
- Token
- Auth Key (if SPin method)
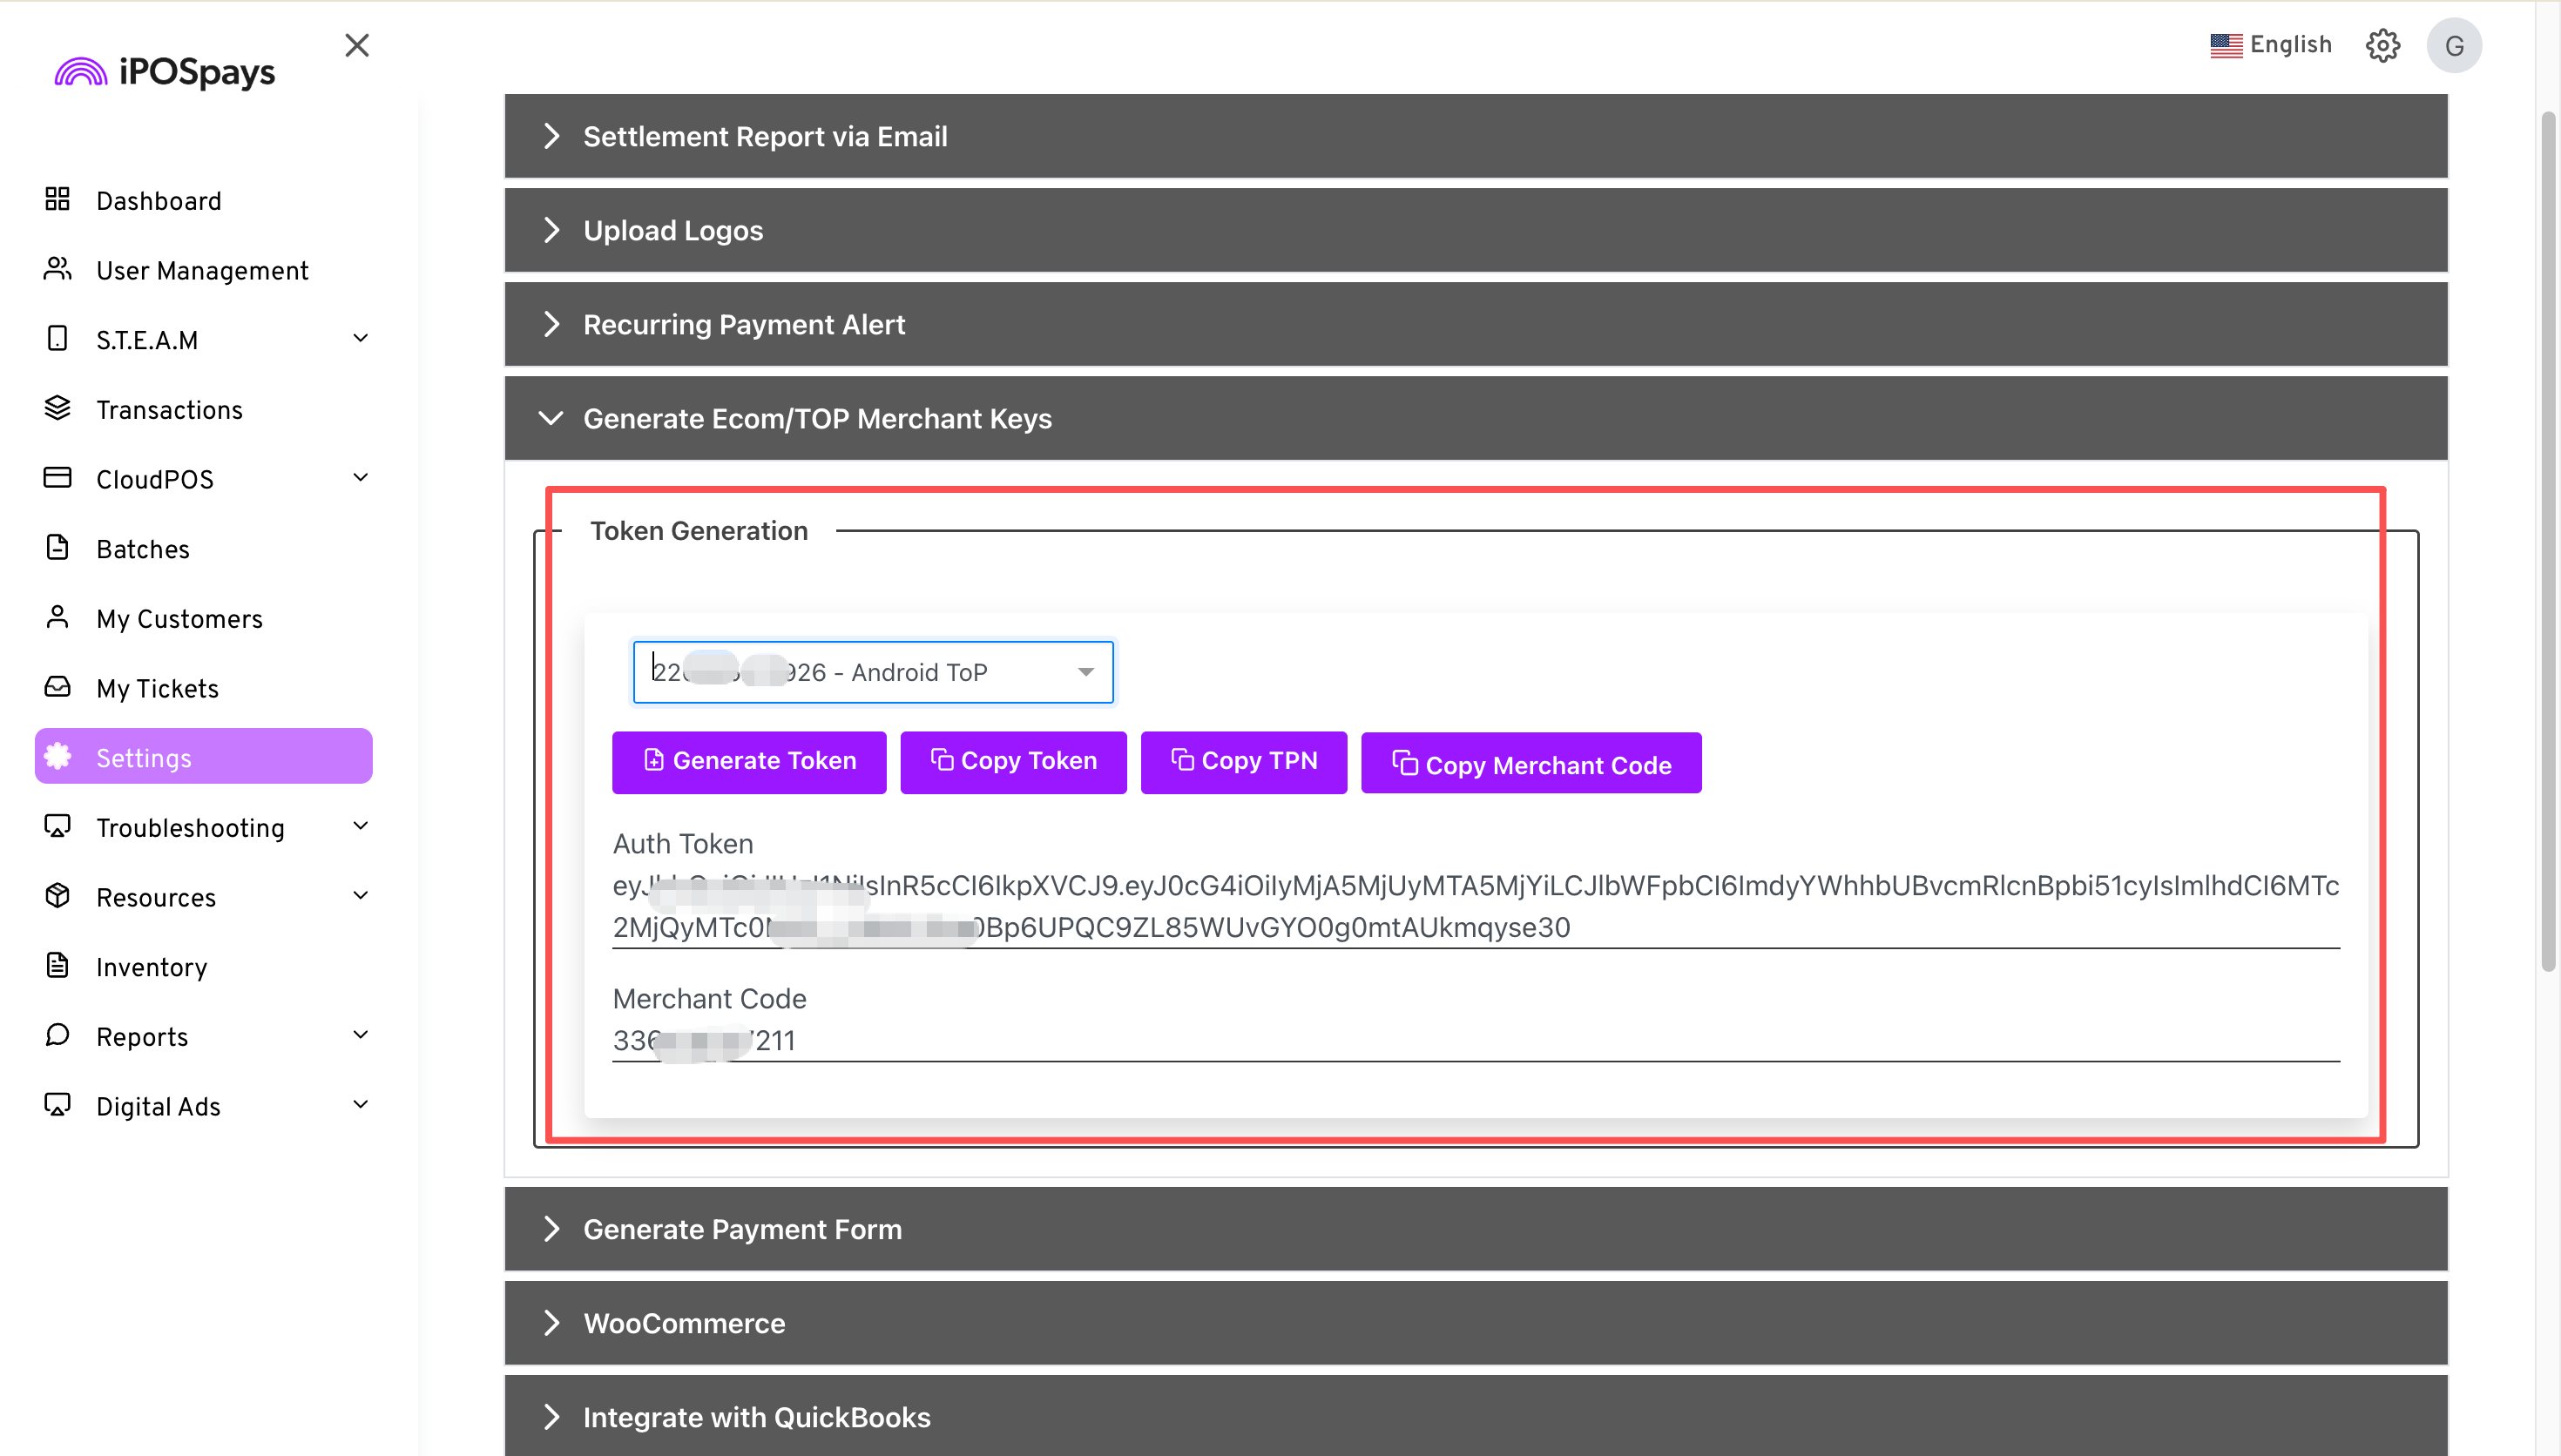
- Merchant Code (if Android ToP method)
Step 3: Configure Payment - Partner Portal
Platform: partner.us.regoo.com
- Log back into Partner Portal with ISO credentials
- Select the merchant store you created in Step 1
- Go to Store → Payment Settings
- Paste the credentials from iPOS Portal:
- TPN
- Token
- Auth Key (for SPin)
- Merchant Code (for Android ToP)
- Select the appropriate payment method/TPN type matching what you created in iPOS
- Save and verify the payment configuration is active
Payment Method Tutorials
Tutorial A: SPin Protocol (Dejavoo P1/P5/P8/P12/P17 via WiFi)
Hardware: Dejavoo P1/P5/P8/P12/P17 payment terminal (WiFi connection)
Required from iPOS: Auth Key + TPN + Token (SPin type)
- On iPOS Portal (logged in as Merchant), create a new TPN with type: SPin
- Copy the generated credentials: Auth Key, TPN, Token
- On Partner Portal → Store → Payment Settings → Paste SPin credentials
- On the Dejavoo terminal:
- Press Settings
- Navigate to Network/Connection
- Enter merchant TPN and Auth Key from Step 2
- Configure WiFi connection
- Save and restart terminal
- On POS Tablet (running OrderPin app):
- Open Settings
- Go to Payment Terminal
- Select the SPin TPN device from the list
- Confirm selection and save
- Test a card transaction on the POS to verify
Tutorial B: Deep Linking (Dejavoo P18 via AIDL)
Hardware: Dejavoo P18 terminal with AIDL local device connection to POS tablet
Required from iPOS: TPN + Token (Deep Linking type)
- On iPOS Portal (logged in as Merchant), create a new TPN with type: Deep Linking
- Copy the generated credentials: TPN, Token
- On Partner Portal → Store → Payment Settings → Paste Deep Linking credentials
- On the POS Android tablet:
- Download and install Dejavoo iPOS app from Google Play
- Launch Dejavoo iPOS and login with merchant account
- Configure payment settings in iPOS app using TPN and Token from Step 2
- On POS Tablet → OrderPin App:
- Open Settings
- Go to Payment Terminal
- Select the Deep Linking TPN device from the list
- Confirm selection and save
- Test a card payment transaction

Tutorial C: Tap to Pay (NFC / Sunmi)
Hardware: Sunmi Cpad or D3 Pro with built-in NFC
Required from iPOS: TPN + Token + Merchant Code (Android ToP type)
- On iPOS Portal (logged in as Merchant), create a new TPN with type: Android ToP (Tap on Phone)
- Copy the generated credentials: TPN, Token, Merchant Code
- On Partner Portal → Store → Payment Settings → Paste Tap to Pay credentials
- On the Sunmi device:
- Open Settings
- Go to About Device → Confirm Android 11 or higher
- Enable NFC in Wireless & Networks
- Download and install OrderPin POS app
- On POS Tablet (Sunmi):
- Open OrderPin App → Settings
- Go to Payment Terminal
- Select the Tap to Pay TPN device from the list
- Confirm selection and save
- Test a contactless card transaction (tap a card against the Sunmi NFC reader)
Tutorial D: HPP — Hosted Payment Page (Online Ordering)
Use Case: Enable online ordering payment — customers pay through a hosted payment page (HPP) when placing orders online
iPOS Backend: CloudPOS
Required from iPOS: TPN + Token (HPP type)
- On iPOS Portal (logged in as Merchant), create a new TPN with type: HPP (CloudPOS)
- Copy the generated credentials: TPN, Token
- On Partner Portal (partner.us.regoo.com):
- Go to Store → Online Payment section
- Select 'Dejavoo' as the payment provider
- Paste the TPN and Token from Step 2
- Save the configuration
- Enable Online Ordering for the merchant store (if not already enabled)
- Test the payment flow:
- Open the merchant's online ordering link
- Add items to cart and proceed to checkout
- Verify the Dejavoo hosted payment page appears
- Complete a test card transaction
Important:
HPP configuration is under 'Online Payment → Dejavoo' in the Partner Portal, NOT under the regular 'Payment Settings' section used for SPin/Deep Linking/Tap to Pay.

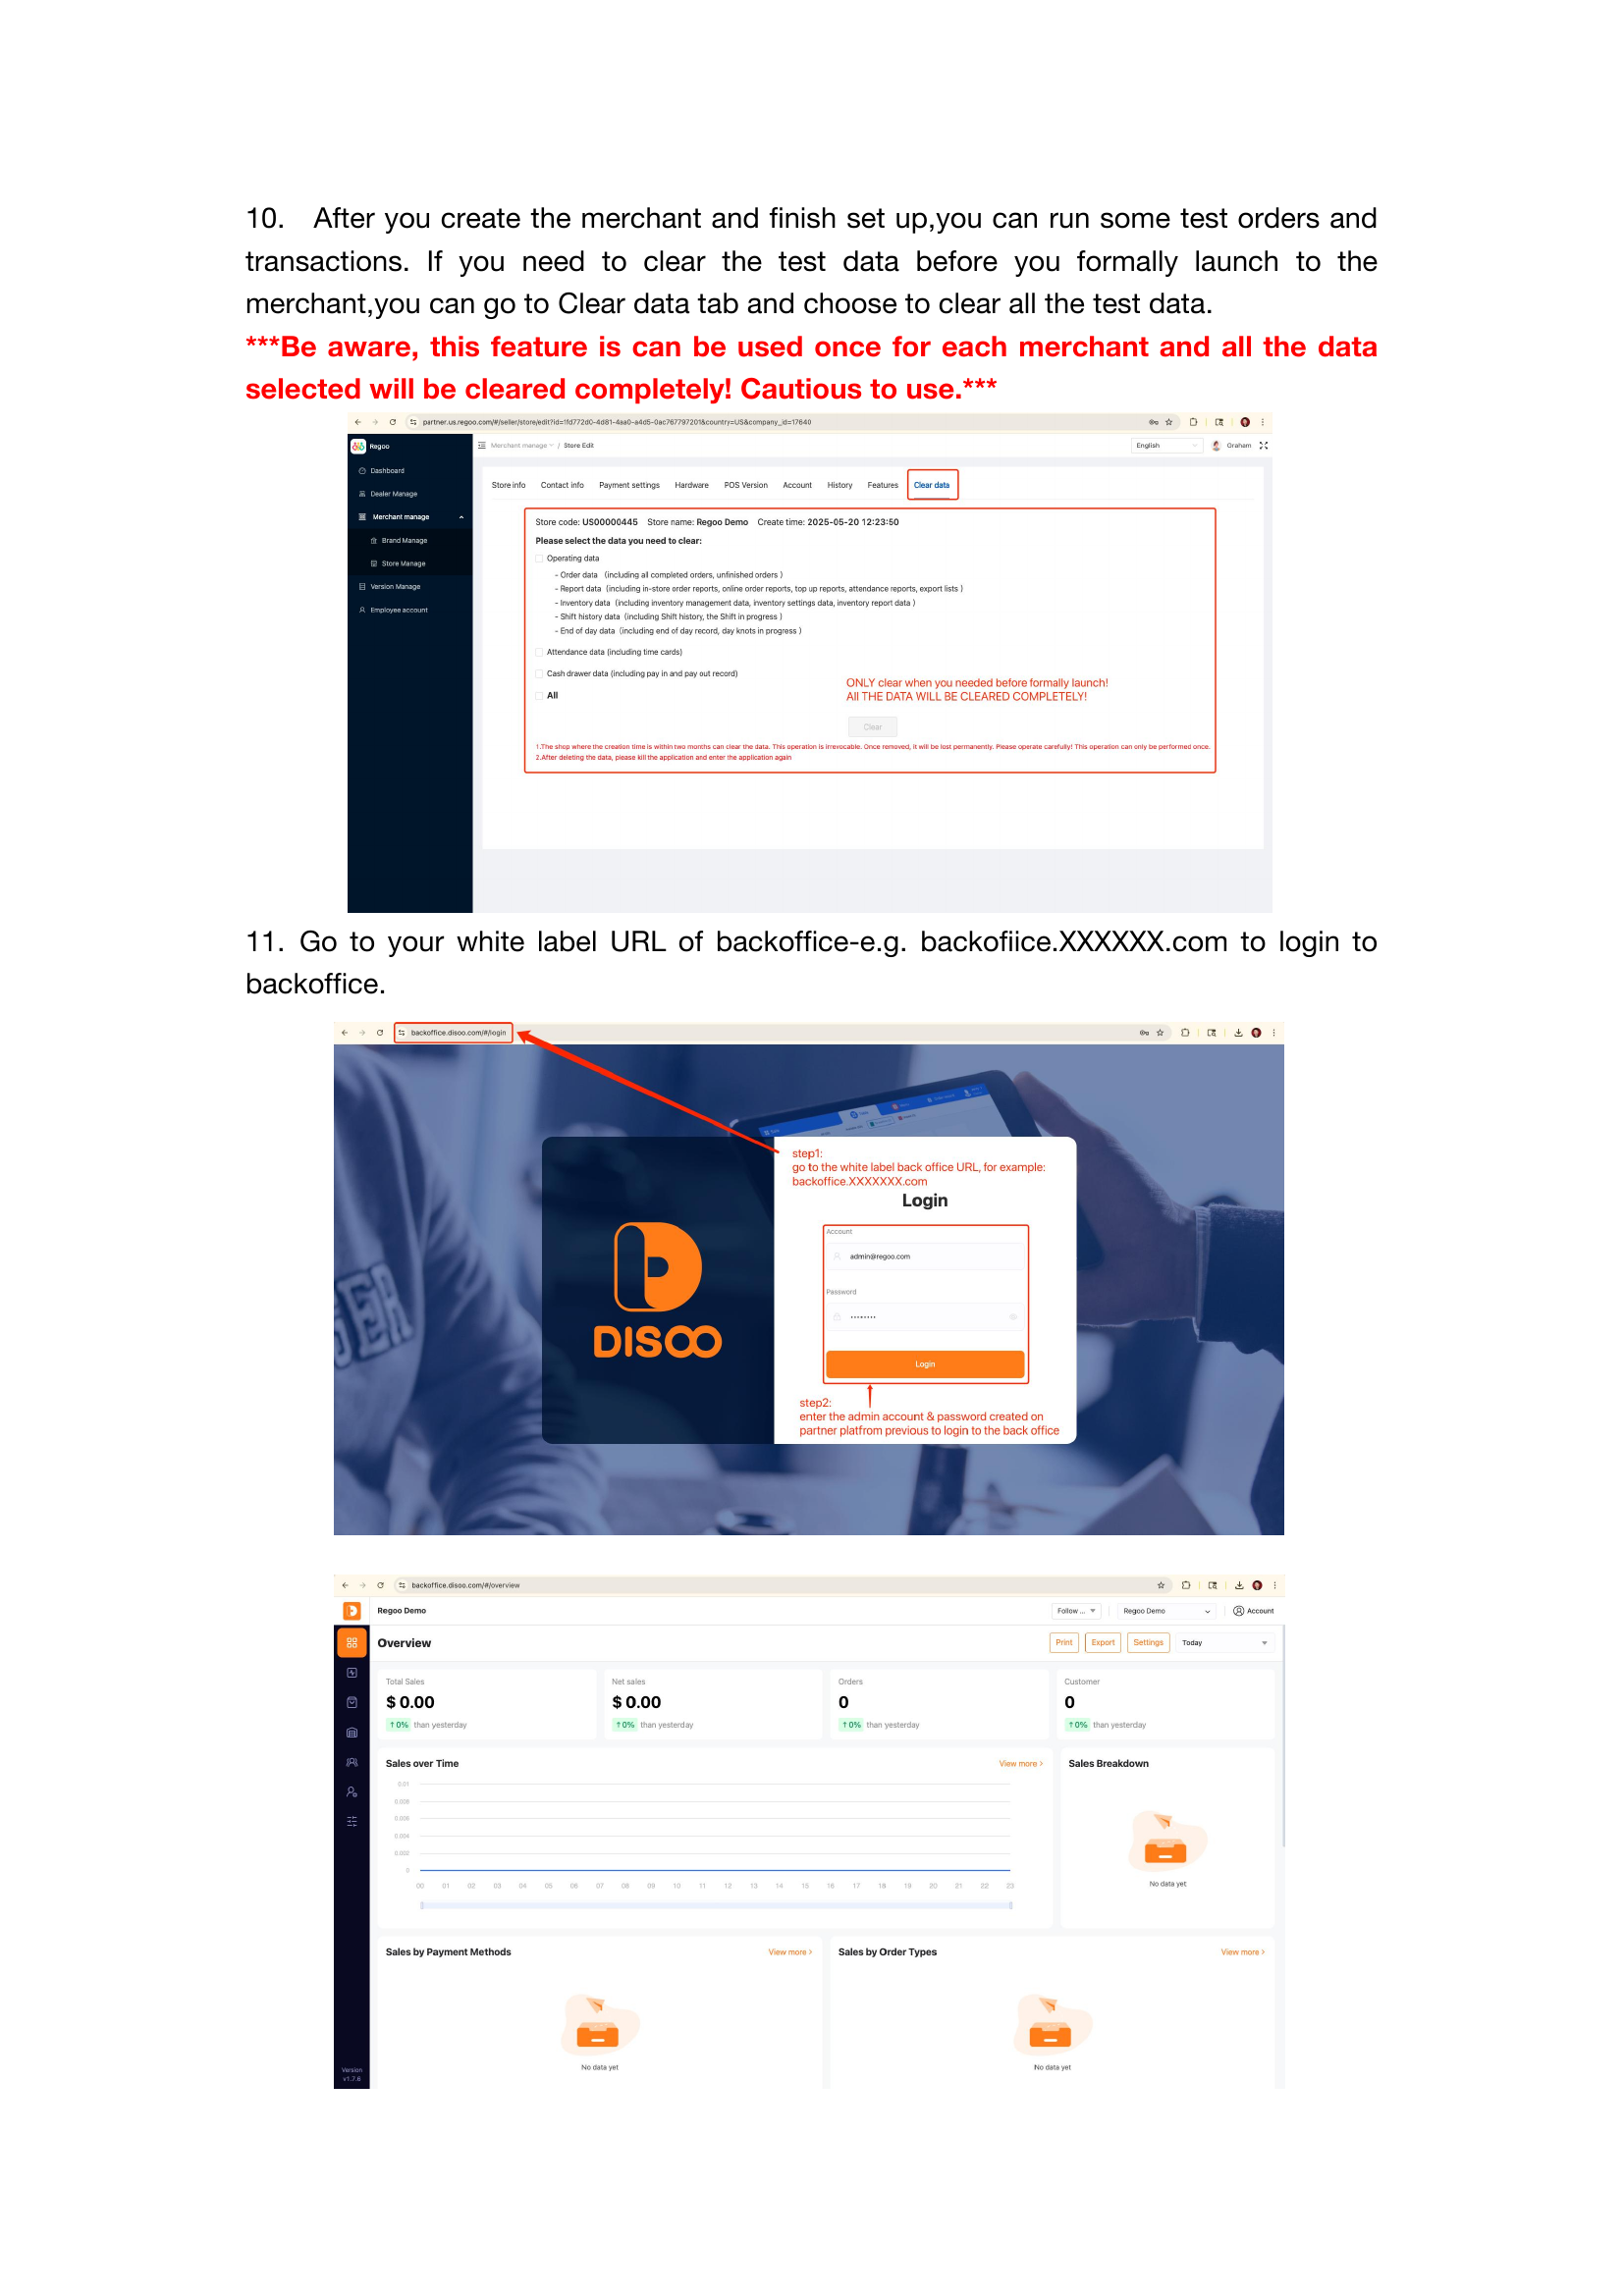
Step 4: Menu & Store Settings
Platform: backoffice.[whitelabel].com (e.g. backoffice.orderpin.us)
Note: Distinguish between Brand Admin (multi-location) and Store Admin (single location) roles
Menu Management:
- Login to Merchant Portal (backoffice)
- Go to Menu Management
- Create Categories (e.g., Appetizers, Main Courses, Desserts)
- Add Menu Items for each category
- Set item details: name, description, price, image
- Configure Modifiers/Add-ons (e.g., size, toppings, extras)
- Save all menu items and verify pricing is correct
Store Settings:
- Go to Store Settings
- Configure Operating Hours (daily schedule)
- Set Tax Rate for the merchant location
- Set Timezone for accurate reporting
- Configure Table Layout (if dine-in applies)
Employee Management:
- Go to Employees section
- Create employee accounts with unique usernames/emails
- Assign roles (Manager, Cashier, Kitchen, Delivery)
- Set specific permissions based on role
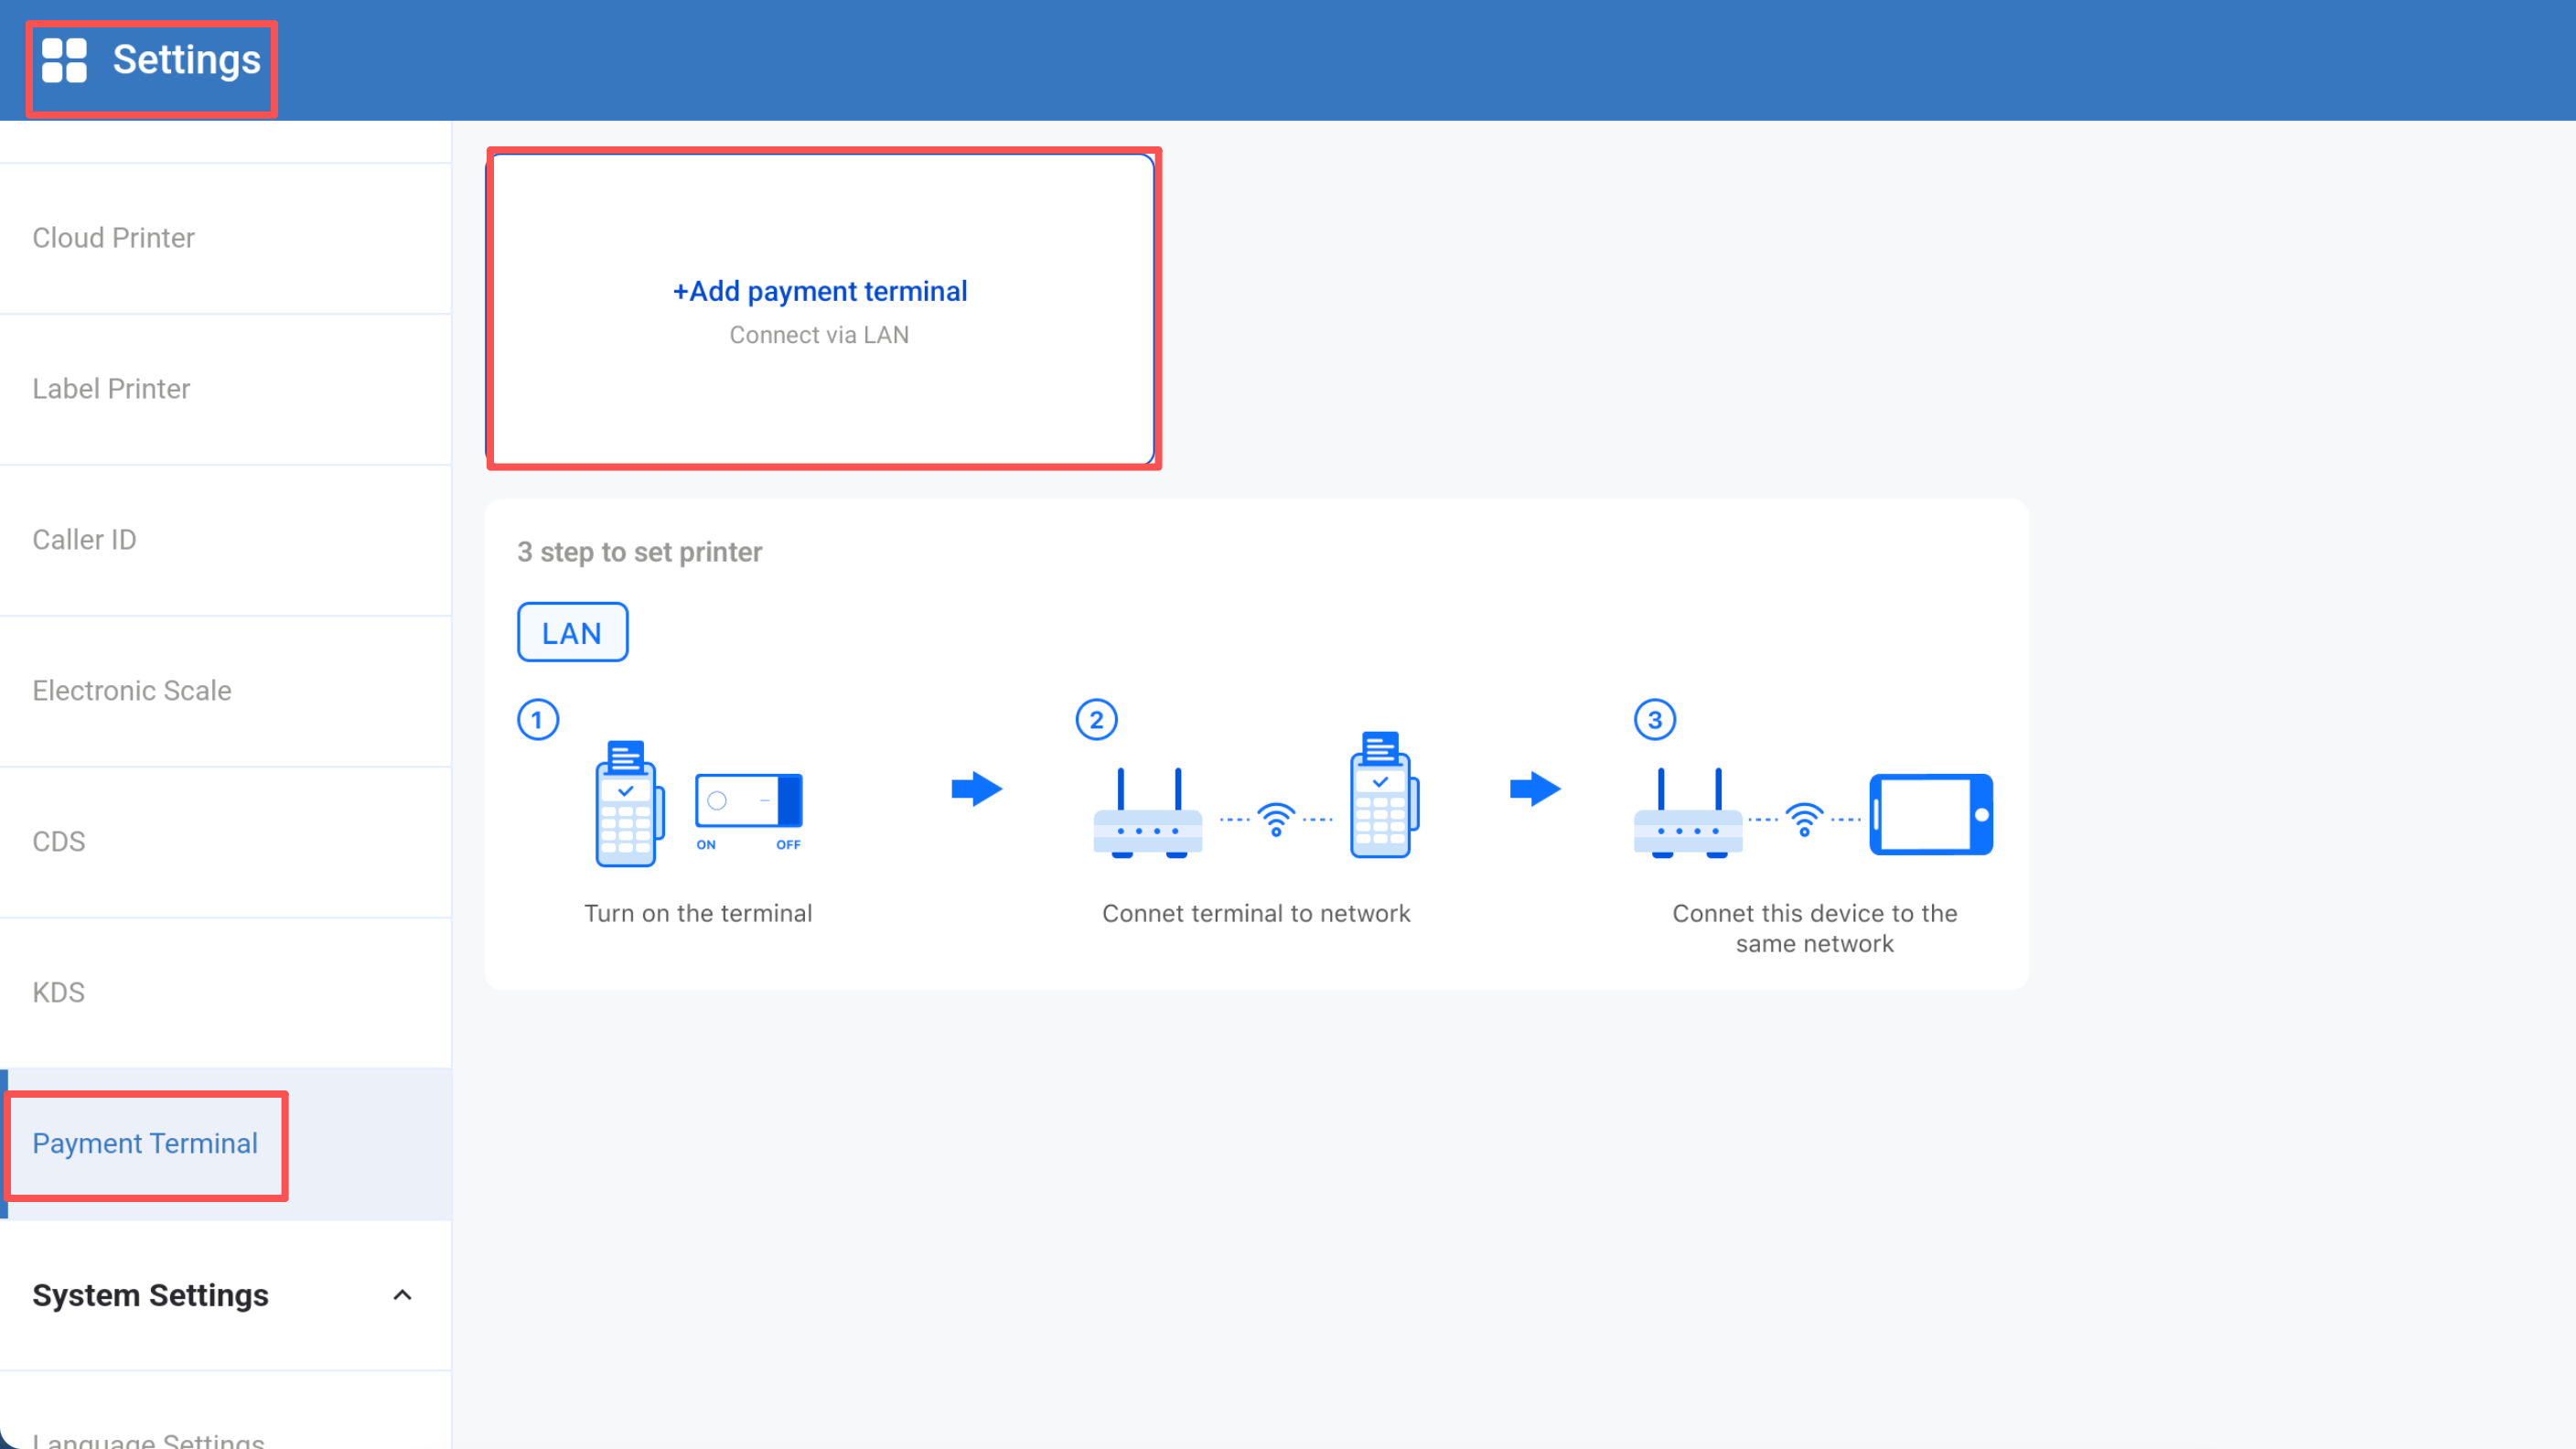
Step 5: Activate Payment on POS Client
This must be completed AFTER iPOS Portal and Partner Portal configuration are done.
Platform: OrderPin POS App (running on merchant's Android tablet)
- Open the OrderPin POS application on the merchant's tablet
- Go to App Settings
- Navigate to Payment Terminal section
- A list of available payment TNPs will appear (matching your Partner Portal configuration)
- Select the correct TPN device based on payment method:
- For SPin: Select 'SPin' or the Dejavoo WiFi terminal name
- For Deep Linking: Select 'Deep Linking' or the Dejavoo P18 device
- For Tap to Pay: Select 'Android ToP' or Sunmi NFC device
- Confirm selection
- Save settings
- Test a card payment on the POS to verify activation
Step 6: Online Ordering Setup
Platform: Merchant Portal (Backoffice)
- Login to Merchant Portal → Settings
- Go to Order Channel Settings → Online Ordering
- Enable Online Ordering toggle
- Configure Pickup settings:
- Pickup Hours (when customers can pick up orders)
- Prep Time (estimated minutes to prepare order)
- Configure Delivery settings (if applicable):
- Enable Delivery toggle
- Set delivery radius
- Set minimum order amount for delivery
- Set delivery fee (flat rate or distance-based)
- Delivery Hours
- Copy the generated Online Ordering Link
- Preview the ordering page to verify menu items appear correctly
- Share the link via:
- Social media (Facebook, Instagram)
- Google Business Profile
- Merchant's own website
- Email / SMS campaigns
Step 7: Hardware & Go-Live
Kitchen Display System
- Device Requirements:
- Android 11 or higher
- 200MB+ storage space available
- Stable WiFi connection
- Download KDS APK from OrderPin portal
- Install KDS app on dedicated Android device
- In Merchant Portal (Backoffice):
- Go to Devices → Add KDS
- Set which order types to display on KDS (dine-in, takeout, delivery)
- Select which menu categories/products to prioritize
- Generate pairing code
- On KDS Device:
- Launch KDS app
- Enter the pairing code from Backoffice
- Confirm pairing
- Test by placing an order from POS or online - it should appear on KDS
Self-Service Ordering Terminal
- Download Kiosk APK from OrderPin portal
- Install on dedicated Android tablet/device (minimum 10-inch display recommended)
- In Merchant Portal → Devices → Add Kiosk
- Configure kiosk settings (language, payment methods, time-out behavior)
- Test customer ordering flow on kiosk
Receipt & Order Printers
- Supported Connection Types:
- USB (direct connection to POS tablet)
- Bluetooth (wireless pairing)
- LAN/WiFi (network printer)
- Connect printer to POS Tablet using preferred method
- In POS App → Settings → Printers
- Add and configure:
- Receipt Printer (for customer receipts)
- Kitchen Printer (for order tickets)
- Delivery Label Printer (for shipping labels, if applicable)
- Test print on each printer
Before going live, verify all items below are complete:
- Merchant created and configured in Partner Portal
- Payment terminals (SPin/Deep Linking/Tap to Pay) created in iPOS Portal
- Payment credentials entered in Partner Portal
- Payment terminal activated on POS App
- Card payment tested and working
- Menu complete with all items and pricing
- Store settings configured (hours, tax rate, timezone)
- POS Tablet connected and all devices paired (payment, printer, KDS)
- KDS installed, configured, and paired (if applicable)
- Printers installed and test prints successful
- Online ordering link generated and shared
- Staff trained on POS operations and payment processing
- All backup payment method documented (manual card entry, etc.)
- Merchant contact info and support escalation path provided
POS Client Payment Activation
After iPOS Portal + Partner Portal configuration:
POS App → Settings → Payment Terminal → Select TPN
⚠ Required for card payments to work!